We just connected an Arduino to the European Space Agency's Mission Control System, the same software that was used to control Rosetta, Sentinels and all other ESOC missions.
Wednesday, November 22, 2017
Getting MOonRails ready for OSCW
Getting MOonRails ready for OSCW
We just connected an Arduino to the European Space Agency's Mission Control System, the same software that was used to control Rosetta, Sentinels and all other ESOC missions.
We just connected an Arduino to the European Space Agency's Mission Control System, the same software that was used to control Rosetta, Sentinels and all other ESOC missions.
Saturday, October 21, 2017
Arduino Nano as a ISP programmer - Part 2 && PCB Giveaway
I did it! A young boy's dream has become true :).. as a kid whenever I dismantled all sorts of electronics devices, mostly to remove the small motors and lights, I always looked at the "green part" (or the circuit board) as something mysterious that I had no idea what it was or how it worked.
Now I've built one myself.

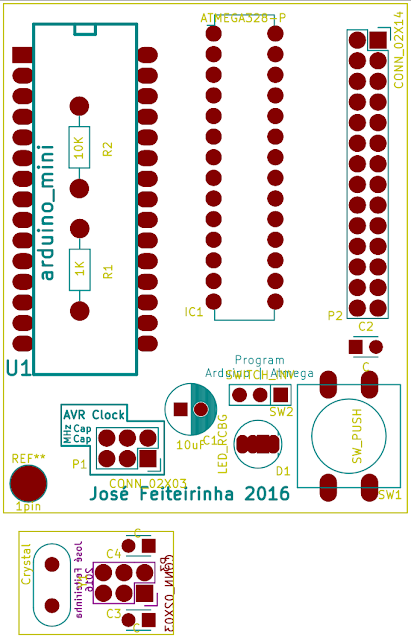
The PCB design
It's actually two PCBs, one for the programmer, and another for the optional clock.
Now I've built one myself.

Doing the design was oddly simple, I had already the breadboard setup (see part 1 of this post) and found this great tutorial on KiCad. KiCad is a tool to draw the schematics and the PCB, it's opensource and although it takes a couple of hours of getting used to, it is very powerful and there are many online resources to help you use it.
Besides the tutorial, I learned a couple things the hard way (read through only if you're interesting in learning Kicad):
- In schematics view: connections with the same label, means they are connected to each other. (I innocently thought that labels were just to give you some guidance and was about to go crazy with wires all over the place when somehow it finally clicked)
- Connecting the things in the PCB can take a long long time, unless you make it easier with an auto-router which does it automatically for you. The one that comes by default with Kicad is not the best, but you can easily use FreeRoute (just follow this tutorial) which I found to be awesome.
- Zones.. what are they exactly? Well.. towards the end of the tutorial I pointed above by Windsor Schmidt, he defines zones and selects an associated net. I had not idea what that meant until my office mate explained me that it basically fills in the rest of the zone/pcb with copper and then connects it on to the net you selected. (I'm not fully sure why is that but maybe it has something to do with turning the PCB space space into a capacitor by having one side with net VCC and the other with GND. If anyone knows better please let me know).
The PCB design
It's actually two PCBs, one for the programmer, and another for the optional clock.

R1 = 1KOhm
R2 = 10KOhm
C1 = 10µF (black is negative)
C2 = 0.1 µF (decoupling capacitor)
D1 = RGB Led (I bought these)
SW1 = Atmega reset button
SW2 = Disables/Enables C1 so you can program the Arduino or the Atmega respectively. (I've used these)
Ordering the PCB
I ordered the PCB from Elecrow, it was quite cheap, roughly 50 Euros total and it arrived quite fast.
Lessons learned


Quantity: As paid for 10 PCBs got 12 instead :)
PCB give away (limited)!
If you read it this far and you feel like building one yourself, just tweet me and I'll send you one PCB free of charge.
Naturally a photo once you get it working would be much appreciated. ;)
PS: In case you noticed, yes, the PCB says 2016 and I'm posting this in later 2017. I had written most long time ago, but never really finished it ready to post until now. Been busy with other things, will post about it soon (I hope).
SW2 = Disables/Enables C1 so you can program the Arduino or the Atmega respectively. (I've used these)
Ordering the PCB
I ordered the PCB from Elecrow, it was quite cheap, roughly 50 Euros total and it arrived quite fast.
- ~10 Euros PCB printing
- ~20 Euros Post
- ~20 Euros Customs
Lessons learned
- Reset button through holes were too small, had to solder it onto the top layer
- I thought it good to place the resistors below the Arduino. Don't think the same anymore. Next time will use SMD LEDs and a more standard placement on the board.
- Panelizing.. it's an option I should have taken it. For a small extra fee they will insert a small cut between the different PCBs and it will make it easy to cut/break throw. To save money I said I'd do that myself, but now I have to cut through each PCB with a carving blade.. and it takes forever and its prone to error. Next time..


Quantity: As paid for 10 PCBs got 12 instead :)
PCB give away (limited)!
If you read it this far and you feel like building one yourself, just tweet me and I'll send you one PCB free of charge.
Naturally a photo once you get it working would be much appreciated. ;)
PS: In case you noticed, yes, the PCB says 2016 and I'm posting this in later 2017. I had written most long time ago, but never really finished it ready to post until now. Been busy with other things, will post about it soon (I hope).
Monday, January 2, 2017
Tinybeans, a word of appreciation.
Since my baby daughter was born that the Tinybeans app is the one I use the most on a daily basis. For me this has been a safe haven where we can share our baby's photos and short movies with our family and close friends away from the public view.
Sure Facebook can have closed groups and you can select with whom to share, but there is value added when an application is done for a specific purpose, it just does it better. There is also a website that my mother uses, but for me, my wife and most family the app does the trick.
Our preferred page is the calendar where it shows a thumbnail for each picture taken since the day she was born, when we delay to add a photo we get kind reminders from the family saying that there is no Tinybeans post yet today.
With our family living across diferent countries (Portugal, Germany and UK) it's surprising how much Tinybeans contributes to make distances feel shorter and bring the family closer together.
Sometimes in the evenening after she's asleep, me and my wife take some time with the tablet going through the Tinybeans calendar and contemplate the amazing growth that our daughter has had and how much we've gone through in such a small amount of time. It makes us appreciate how amazing life is and how much our own parents have sacrificed for us and why they say it was all worth it.
So, thank you Tinybeans, thank you for a great idea and implementation. As a developer myself I wish you the best of luck and success.
PS: The Tinybeans did send me an e-mail asking for a review on any parenting forum I belong to. I don't belong to any, but - while it would be appreciated (wink) - I'm writing this above all because it's true and they deserve it. Too much good feels have sprout from them for me to simply ignore a kind request.
Subscribe to:
Posts (Atom)