Thursday, September 29, 2016

Arduino Nano as a ISP programmer

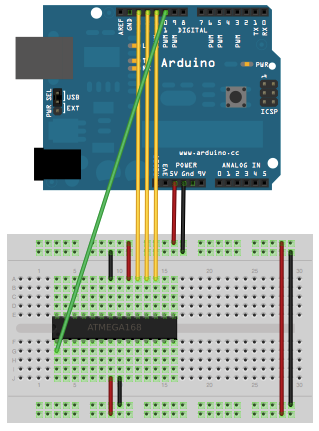
So, rather than buying a programmer, I decided to make my own using an Arduino Nano, altogether I was able to save about.. 1 euro.. and only invested several hours.. :)

I mostly followed this awesome tutorial

With minor changes:
(1) I used a single RGB led with a 1 KOhm resistor. The RGB led is interesting because since different colors have different resistance you have a sort of priority of colors. In this case:
If Red is on, then it will show Red independently of Green or Blue status.
If Red is off and Green is on, it will show Green independently of Blue status.
If Red and Green are off and Blue is on it will (duh) show Blue.

This is awesome since I can use blue for the watchdog, green for write and red for error, all with just one led.

(2) I've removed the external crystal by adapting the "minimal setup" shown here.


I still need to  wait for my ZIF to arrive and then design/printout the casing + do the soldering, but after many hours I'll be happy because I saved about 1 euro if at all. :)

In the casing, I'll probably add slots so that I can easily plug-in the clock and capacitors in the future.


The capacitor shown of the left of the Nano is required for most cheap ones and must be removed when programming the nano itself, so my casing will also have a "Program Arduino/Program Atmega" switch that disables the capacitor when programming the arduino directly.

Wednesday, September 28, 2016

Ongoings

As a way for me to keep up, here is a list of my current on-going pet projects.

Task clock - A countdown timer capable of holding multiple countdowns for independent tasks.
Its an hardware fun project, involves soldering and 3d printing. Most of it is planned in my mind and plenty of parts have been bought and are its way. Currently I'm trying to get an Arduino Nano to program an atmega328p which will be the micro-controller used. 

Still not sure:
- how I'll be able to upload new tasks (if possible at all)
- whether or not I'll have support for batteries (requires a power booster for the LCD and battery charging circuits)


Board Charts - Trying to extract line/circles information from a picture and overlaying that information as a way to make it look more professional.


MOonRails - Making programming for micro-controllers easier by merging code conventions and communication standards. That's all I can say for now ;)

Tuesday, July 19, 2016

D1 refils review

This is a short review of my set of D1 refils that I recently bought from cultpens.com

My pen is a classic Lamy 401 multipen which takes four D1 refils .

Although the pen is great, I wasn't fully happy with the refills themselves. The ones that came with the pen (from Lamy) seemed a bit thick and often would fail on the first scratch on paper after some hours without use.


I previously had used (and loved) the 0.7mm needle point with my OHTO Tasche so I wanted to try the D1 needlepoints.

When it all arrived, I had a total of 14 different refills  to pick from, here are my afterthoughts.

Black:
Lamy M21 Black
Schneider Exp56 Black
Ohto T-4C7NP (0,7mm) Black
Ohto T-4C5NP (0,5mm) Black

The Lamy and Schneider blacks are very similar although the Schneider is slightly darkers.
The Ohto needlepoint 0.7mm the back is quite dark and smooth to move the pen.
The Ohto needlepoint 0.5mm actually felt like a needle, on some points it felt I was stabbing the paper, not easy for me to write.

I've also compared the Otho 0.7 & 0.5 to see if I could fit more details but didn't see a significant benefits.
See test below:
(top is 0.7mm, bottom is 0.5mm)


It's worth mentioning that I mostly use black, the other colors are to highlight, add details, contours, etc...

Other colors
Ohto
So when picking the other colors, I was disappointed with the Ohto, I was hoping for bright Reds, and Blues (Ohto has no D1 needlepoint green), but got instead very bright/light tones (e.g. Red had hints of bright pink) which might appeal to other's tastes, but not what I'm going for.
I since I want to use those colors to highlight, I also didn't find the thin needlepoint to be the most adequate for me.


Lamy Orange
Quite a boring orange I must say. I bought it mostly out of curiosity. I can see it matching well with a tri pen, but not really interesting when you have four pen colors.


..What was left was a Blue/Red/Green from Lamy and Schneider plus a Green from Monteverde.

Lamy vs Schneider
Colors are darker on the Schneider than on the Lamy refils, in particular the Lamy Schneider blue feels a bit too dark for me (not enough contrast against the black). Nevertheless my final picks were the Schneider refills since they tend to work better since the first scratch and when you want to quickly not down something, they do the trick better than the Lamy.

The Monteverde green was ok but in the end I still felt the Schneider were smother to write with.

Since a picture is more than a thousand words, here are two high resolution scans, plus a side-by-side photo on different paper types. The dotted grid paper is a Leuchtturm1917, the other is just a random (cheap) paper.

The scanned images are very high quality, so you may want to open them separately.


Reviewed items:
Lamy M55 tripen marker refill
OHTO Needlepoing Multipen Refill Extra-Fine R-4C5NP Black
OHTO Needlepoing Multipen Refill Fine R-4C7NP Black
OHTO Needlepoing Multipen Refill Fine R-4C7NP Blue
OHTO Needlepoing Multipen Refill Fine R-4C7NP Red
Monteverde Soft Roll Mini Ballpoint Refill Medium D13 Green
Schneider Express 56 Pen Refill Black
Schneider Express 56 Pen Refill Blue
Schneider Express 56 Pen Refill Red
Schneider Express 56 Pen Refill Green


Final setup
OHTO Needlepoing Multipen Refill Fine R-4C7NP Black
Schneider Express 56 Pen Refill Blue
Schneider Express 56 Pen Refill Red
Schneider Express 56 Pen Refill Green


Edit 2016.09.04 - Corrected Schneider rather than Lamy is too dark (on Lamy vs Schneider)
Wednesday, June 15, 2016

Quick debug tip with Vi

Recently I had to debug a 2k lines perl file which was hanging somewhere without any message. Having never looked into the code before I was about to go through the traditional "print 'I am here!'" binary search in the code when I got an idea.

A couple of searches later and I built my vi command:

  • :%s/^$/\=printf('print "%-4d\\n";', line('.'))

What this does is replace every empty line in the code with a print of the number of the line.

e.g. if line 10 is empty then it will be be replaced with:
  • print "10\n";
Otherwise it will be left as is.

Turns out the code was blocking on line 954.


Monday, March 7, 2016

Just some random 'art'

The initial name of this blog was 'random-digit' for some reason. I've always been fascinated by how randomness can lead to art.

On my new pet-project I've designed a mini processor to generate random images.

This is the gist:
  • The processor has a basic set of registers (x,y,r,g,b) and optionally up-to N 'general purpose' registers ( r0... rN); all registers are floats.
  • The code of the processor is a list of attributions in the format <register> = <expression>. 
  • The <expressions> are binary trees with the nodes containing one operator ( + , - , / or  * ) and the leafs are any of: any register, a constant value X, Pi, sin(<expression>), cos(<expression>), sqrt(<expression>) or simply <expression>.
  • The number of such attributions is configurable. E.g. here's an example of 16 attributions code:
    •     y = r2 - r0
          y = x * y
          r1 = r / y
          r = x - y
          r2 = b * r2
          x = g * sin(x + 0)
          r2 = x - 0.30149573
          g = r1 / b
          x = r1 + r2
          r0 = r2 - r2
          g = r0 / g
          g = PI - r0
          r = r0 + y
          g = r + r0
          g = r + cos(cos((r1 + 0.9902641) - b) - r)
          r = r - 0
          r0 = b + g
          y = 0 * x
          r1 = x - g
          y = b + r2
          r = g / r0
          x = r0 * x
          r2 = y / r2
          y = g + y
          y = b * r2
          r0 = cos(g + PI) / x
          x = r0 - y
          b = r2 + 0
          r2 = y / g
          y = r * y

The 'emulator' will then iterate over the randomly generated code and at the end of each full  execution will place a pixel of color (r,g,b) on position (x,y) and then resume from start. The absolute and modulus 1 of the registers  (val = abs(r) %1f) is applied to ensure the output value is within the image and a valid color.

Naturally most of the "software" is trash and is automatically discarded. From the rest, I manually discard many it for being too boring, and on occasion some is kept because 'it looks nice'. :)

Here's a couple of those:


Friday, February 19, 2016

ChronoPi latest release comes with a new ad

Someone told me that my app was very geeky... but I think I took it to the next level with my new ad..